BRAT Biped PS2 & Bot Board II Tutorial
| PS2
Biped BRAT Tutorial.
Updated 12/20/2011 Safety first! Wear eye protection and never touch a powered robot! Note: This tutorial uses the Bot Board II, BASIC Atom Pro 28, and a wireless PS2 controller/receiver. Software: |
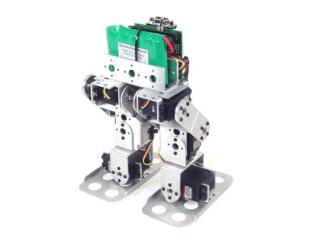 Image of Biped BRAT. |
||||||||||||||||||||||||||||
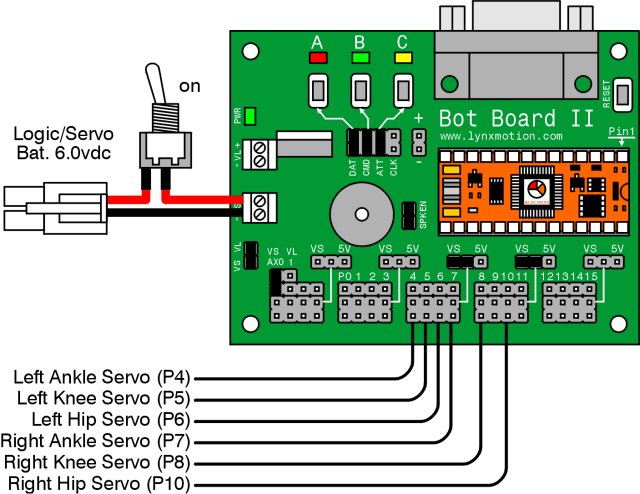
| Step 1. Make sure your servos are plugged into the appropriate channels, as shown in Table 1. *Note, P9 is used by the speaker, so we can't plug a servo in there. |
|
||||||||||||||||||||||||||||
| Step 2. Make sure the Bot Board's jumpers are set according to Table 2. Refer to Figure 2 for help with jumper settings. *Note, the VS to AX0 jumper enables the program to monitor the servo battery voltage. When the battery is low, the robot can beep in warning. |
|
||||||||||||||||||||||||||||
|
|
|||||||||||||||||||||||||||||
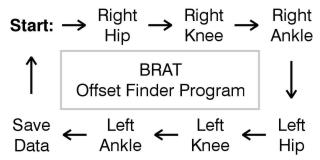
| Step 3. Download and install BASIC Micro Studio. Download the BRAT Servo Offset Finder program, and load it into the IDE. Program the Atom Pro, and follow these instructions to find your robot's offsets.
Note, if you have the Speaker enabled, when you press the B button you will hear a short tone. The tone will raise in pitch when you change from servo to servo, and will lower in pitch and be longer when you get back to Start. |
|
||||||||||||||||||||||||||||
| Step
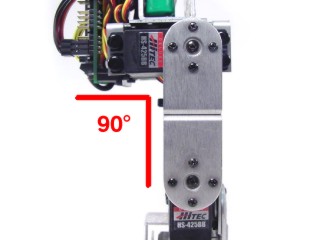
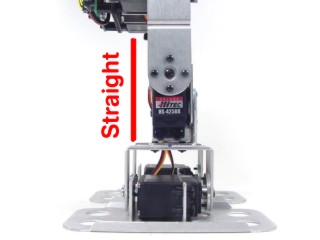
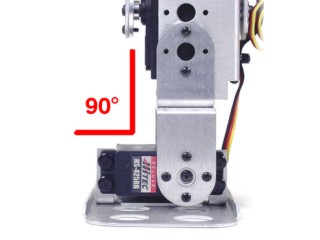
4. Place the robot in a position as close to neutral as possible, and turn it on. Your robot should go to and hold the neutral position, and should resemble figures 4-1 through 4-3. If the joints are off by more than 15° you may have made an error in assembly. To correct this, remove the center screw from the round servo horn, pull the servo horn off the servo, rotate until it's aligned, then reattach the servo horn. Use the A, B, and C buttons to straighten the BRAT as shown in Figures 4-1, 4-2, and 4-3. Note, if you are building the robot with HS-422 servos, you will notice the hip servos oscillate if the robot is lifted off the ground. This is normal, and is due to the lower power servo. When the robot is walking, the effects are minimal. Using a voltage that is higher than 6vdc will make the oscillations worse. When building a robot with more powerful servos such as HS-475, HS-485, or HS-645, you will not see this effect. After you've cycled through the servos and adjusted them to match Figures 4-1 through 4-3, pressing the B button again will save your offset values to the Atom Pro's EEPROM. |
|
||||||||||||||||||||||||||||
|
|
|
||||||||||||||||||||||||||||
| Step
5. Download the PS2 BRAT Code, load it into the IDE, and program your BRAT. |
|||||||||||||||||||||||||||||
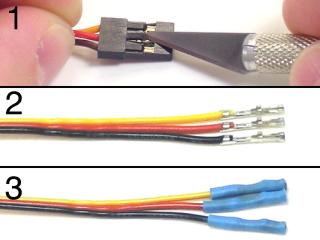
| Step
6. Now you need to create the PS2 cable to hook up PS2 control. Repeat this step on one side of both 6" servo extender cables. 1. Use an exacto knife to carefully pry the black tabs up and slip the wires out of the black housing. 2. Remove the black housing completely and set aside. 3. Cover the header pin receptacles with 1/2" of heat shrink. |
|
||||||||||||||||||||||||||||
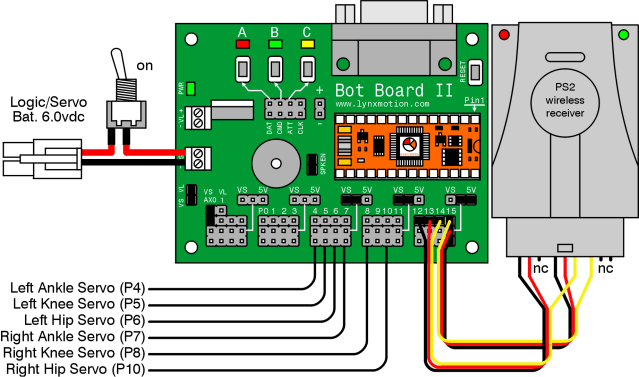
| Step
7. Plug the cables in to the Bot Board II as shown.
|
|
||||||||||||||||||||||||||||
|
|
|||||||||||||||||||||||||||||
| Step
8. The PS2 control commands are shown in Table 8. |
|
||||||||||||||||||||||||||||