BlueSMiRF and SSC-32 Configuration Tutorial
| BlueSMiRF and SSC-32 Configuration Tutorial. By James Frye Updated 06/18/2007. This tutorial is to help connect a SparkFun BlueSMiRF to the SSC-32 to be used with LynxTerm or the SEQ-01 Visual Sequencer program. We were able to achieve a range of over 50 feet using the 582 ceramic antenna module indoors, line-of-sight. We were unable to test it at a greater distance due to the small size of our office. We can only assume the 158 duck antenna version has a longer range. |
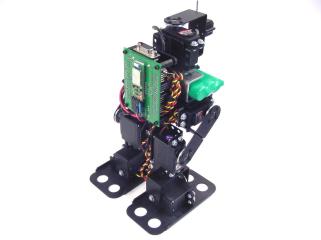 Image of BRAT with BlueSMiRF. |
||||||||||||||||
| Necessary Hardware
You will need: Choose one of these modules: |
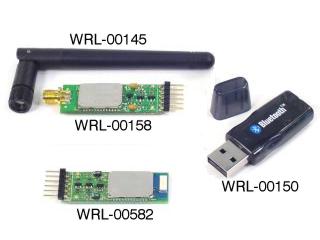 BlueSMiRF modules and Accessories. |
||||||||||||||||
| Step 1. We need to create a custom cable. Using a DC-02 data cable as a base, you will need to remove the violet wire's female connector from the black housing on one end. Refer to Figure 1 for an example of how to easily remove a connector from a black housing. |
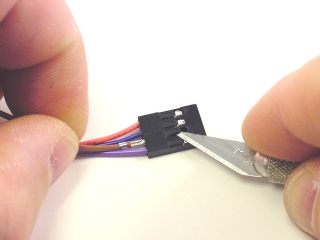 Figure 1. |
||||||||||||||||
| Step 2. Cover the exposed connector with heatshrink to avoid shorts. Your cable should look like Figure 2. |
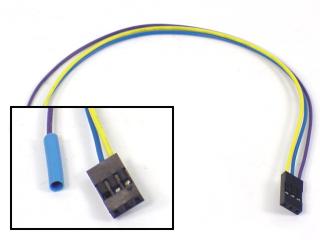 Figure 2. |
||||||||||||||||
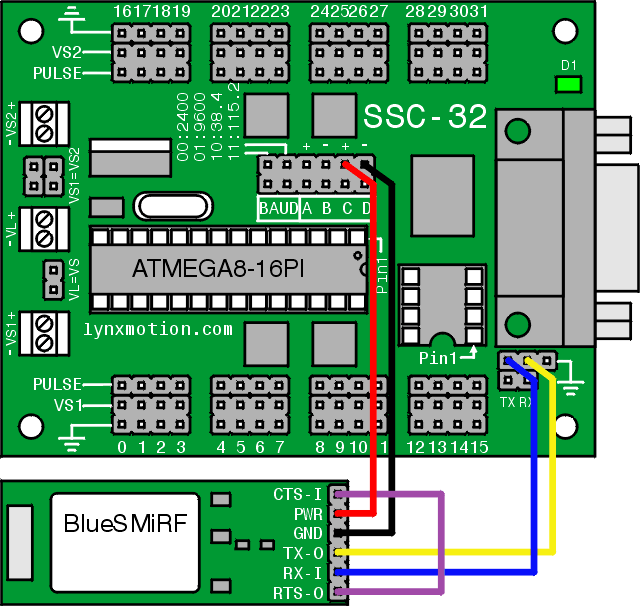
| Step 3. Connect the data and power cables to the BlueSMiRF as shown. Consult Table 3 for connection information. A wiring diagram is available directly following Step 4.
|
 Figure 3. |
||||||||||||||||
| Step 4. Connect the data and power cables to the SSC-32 as shown. Consult Table 4 for connection information. A wiring diagram is available directly following this step.
|
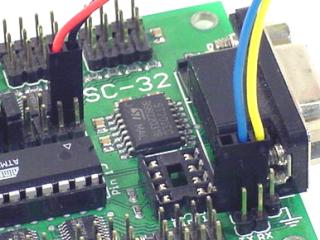 Figure 4. |
||||||||||||||||
| Wiring Diagram. Refer to the following diagram for wiring information.
|
|||||||||||||||||
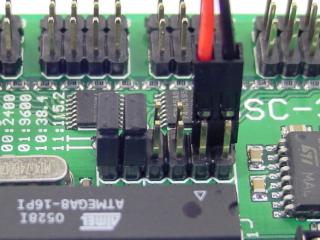
| Step 5. Set the SSC-32's baud rate to 9600, using the jumper configuration as shown. |
 Figure 5. |
||||||||||||||||
| Step 6. Install the BlueSoleil program, which is included with the KB-018 Bluetooth USB Dongle. Open the program, and plug the dongle into the computer. The "Welcome to Bluetooth" message shown in Figure 6 should pop up. Type in a device name and select a type. Click "OK" to continue. |
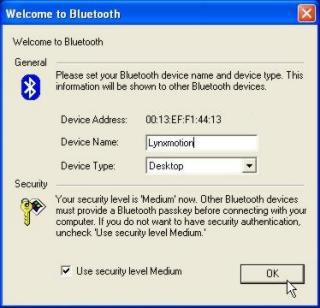 Figure 6. |
||||||||||||||||
| Step 7. Apply power to the SSC-32, and click on the orange "sun" in the center of the screen to search for Bluetooth devices. Note: When the SparkFun device is first loaded, it will occasionally appear as a device address instead of a name. You must wait until the BlueSoleil program finishes searching for additional Bluetooth devices for the name to appear. Please wait until the name appears before continuing. |
|
||||||||||||||||
| Step 8. Right click on the SparkFun-BT icon, and click on "Refresh Services". Next, right click on the SparkFun-BT icon, and click on Connect > Bluetooth Serial Port Service. Note: The first time you connect, the "Quick Connect" dialogue will appear. What you choose here is your choice. Please make a note of which COM port is listed. |
|
||||||||||||||||
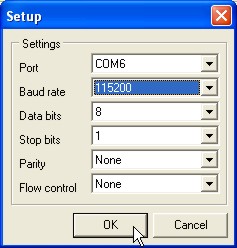
| Step 9. Download and install Lynxterm. Click on "Setup" in the "Port" section and change the baud rate to 9600, and change the COM port to the one listed in the Quick Connect dialogue. |
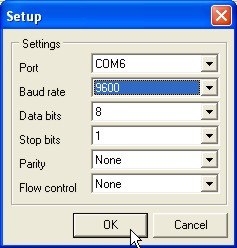 Figure 9. |
||||||||||||||||
| Step 10. Click on "Setup" in the "Terminal" section. Make sure your settings are the same as in Figure 10. Double-check to make sure "Send line feeds with carriage return" is turned off!
|
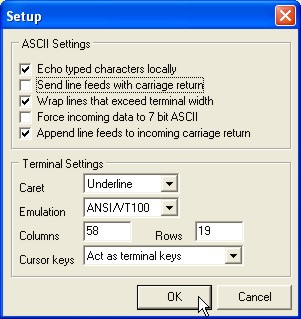 Figure 10. |
||||||||||||||||
| Step 11. In the main terminal screen, type "ver" and then hit "enter" to test connectivity to the SSC-32. You should see "ver" replaced with your firmware's version. Now type "+++" and hit "enter" to activate "Configuration Mode" on the BlueSMiRF. You should see "OK" on the screen after you enter the "+++". |
 Figure 11. |
||||||||||||||||
| Step 12. Type "AT" and hit "enter". You should see "OK" returned on the screen, confirming that communication is still possible with the BlueSMiRF. If you don't see an "OK", go back through the tutorial and double-check your settings. Now type "ATSW20,472,0,0,1" and hit "enter". This changes the baud rate to 115.2k baud. Note: This command does not return an "OK" on completion. Reminder: Terminal applications do not allow the use of the "Backspace" button! If you make a typo, just hit "enter" and try it again. |
|
||||||||||||||||
| Step 13. Type "ATSI,8". Disregard the rest of the line - it's just leftover from the previous command. You will see a return of "OK" and "01D8,0000,0000" which is the baud rate written in hexadecimal. If this number is different, then you need to repeat Step 12. |
|
||||||||||||||||
| Step 14. Click on "Setup" in the "Port" section, and change the baud rate to 115200. Now disconnect from LynxTerm (press "Disconnect" in the "Port" section) and BlueSoleil (right click on the SparkFun icon, then click Disconnect > Bluetooth Serial Port Service), and turn off the SSC-32. |
|
||||||||||||||||
| Step 15. Set the SSC-32's baud rate to 115.2k baud, using the jumper configuration as shown. Turn the SSC-32 back on. Reconnect BlueSoleil (right click on the SparkFun icon, then click Connect > Bluetooth Serial Port Service), then reconnect LynxTerm (press "Connect" in the "Port" section). In LynxTerm, type "ver" and hit "enter" for the final test. You should see the firmware version returned on the screen if all is well. Congratulations! You can now control your robots without the annoyance of wires! |
|
||||||||||||||||
| Step 16. For our testing, we did not have to change any timeouts in LynxTerm for reliable communication. However, we did have to change some timeouts in SEQ-01. Click on "Timeouts" and refer to Figure 16 for specific values. It's a good idea to experiment with timeout values. Try to find the smallest values that still allow reliable communication. |
|
||||||||||||||||